During WW II, there was a need to design a way for Sherman tanks to cross bodies of water. One of the solutions was to fit a tank with a screen that would rise by inflatable tubes and disperse enough water that would float 35 tons. A pair of propellers attached to the transmission provided propulsion. These were knows as Duplex Drive (DD) tanks and were successful in calm waters. Not so much in choppy water. I decided to finally tackle building the DD tank for my collection and to document the build in this log for a friend.
Keep in mind I am no professional and am usually making things up as the build progresses. Also, I want to give credit to the original photographers for any photos I use in this blog. I will post pictures I find relevant to the build from various sites on the web.
According to web sources, the British converted 693 Sherman tanks into DD models. 293 were Sherman III (M4A2), and 400 Sherman V (M4A4). US DD thanks were converted M4A1(75)s.


This project will depict two British Sherman III DD tanks, one with the skirt up and one with the skirt down. The core kits are the Dragon 6062 M4A2 Tarawa tanks. A review by Armorama on these tanks indicate that although the box top and decals portray USMC tanks, this version was extensively used by British Commonwealth troops and by Polish and Free French armoured units in North West Europe and Italy.

Source information on DD tanks is rare. There are some surviving tanks on display and some model kits produced. For the M4A2 version, the Bovington Tank Museum has the only surviving tank with the screen intact on display in the world. I believe this DD tank was one of the British tanks that landed on D-Day in 1944. Much of this build will be based on this tank. The book Swimming Shermans: Sherman DD Amphibious Tank of World War II (New Vanguard) has a cutaway view of an M4A2 DD that was also helpful.
There were several formations that used DD tanks during Operation Overload (D-Day). The tanks I will build represent belonging to the 13th/18th Royal Hussars who landed on Sword Beach. From my information, they used Sherman III DD tanks. Please allow for certain artistic interpretation as the build progresses. The main conversions made to the kits include adding the extended screen skirts and screens, struts, and the new drive gear. One note on the Dragon 6062 M4A2 Tarawa kit. This tank used the one-piece cast transmission cover. The DD tank at the Bovington museum has the early 3-piece bolted transmission cover. From my research, it seems most British Sherman III tanks used the one-piece cast transmission cover, the 3-piece bolted cover was rare. I do not know if all their DD tanks had the 3-piece cover, but I will use the one-piece cover that came with the kit since I don’t have any spare 3-piece covers.


So, let’s get on with the build. The first place I like to begin a Sherman tank is with the suspension. Since I am making two tanks, I will have to put 12 sets of bogies together.
Here are the bogie parts ready for painting. For small parts, I like to take tape and staple it to a board to hold them. Sherman wheels come in five and six spokes, open and solid. Drive sprockets come in solid and fancy styles, and it was common to see different types on the same tank. One of the great strengths of the Sherman was the ability to cannibalize parts from one tank and fit them on another. For these tanks, I am using the solid wheels that came in the kit and the solid drive sprockets for the front, and fancy for the back. I rarely airbrush anymore, and usually use spray paint. Just put it on in light coats and it works fine. Shermans, like most military vehicles, were in shades of olive drab, but there were variations of brown and such depending on where they were located. This Krylon Maxx paint is new, and seems to work well. Also, when I paint parts, I like to paint the backs first and then the fronts second.

Toothpicks come in handy when painting tank wheels.

I had to drill out the holes of the wheels and suspension, they were just too tight when trying to put the bogies together.

Bogies are complete. I’ll probably weather these before attaching them to the hull.

Now that the bogies are done, I can move on to building the extended hull parts for the screens. This will take some trial and error to figure out exactly what I need to do as far as construction on the hull before adding the extended sides.
I constructed part of the hull to prepare for adding the skirt sections. Another note on the kit, the holes for mounting the tools are not open on the hull. This is a nice feature if you don't want to add the tools to the hull. I drilled out the holes, but upon further research it seems DD tanks did not carry the tank tools on the hull. I haven’t seen any DD tanks with the tools mounted. So, I decided I will not mount the tools, and ended up filling in the holes with putty.

Working on the extended sections for the screen, I first made patterns on paper before cutting them from plastic stock. I cut the side sections 1cm and the back 2 cm out. The front is about 2 1/2 cm from the sides and nose. I cut strips of thin plastic stock to help brace the sides together.


The screen extensions are done.

The next section of the build I am moving on too is the idler wheel and propeller gear.


The rear idler wheel is different from other Sherman tanks. The way I am making these is using open idler wheels from the parts box and cutting half the outer wheel off. The propellers I am using are 22mm brass, however, I think anything from 18-22mm should work. I just found a decent deal on two pairs of these. The propellers on the tank do not have the nose cone pieces, so I cut those down and glued a little piece of round rod to simulate the nut, then painted brass.


The main propeller gear is done, just a little clean-up to do. The DD tank at the Bovington has skid plates added under the propellers. This is a feature I have not seen on any other DD tank, but I went ahead and added them anyway.


Came across this picture of a D-day M4A2 DD tank that has some interesting features. It appears to have the one-piece transmission cover and T54E1 steel chevron tracks. The Dragon Tarawa kit has these tracks, so that works. I read DD tanks had to use steel chevron tracks to properly disembark from landing craft. It also has mounts for smoke launchers on the turret, which I was debating to add or not. At least I know some had them installed.

I added most of the little details on the hull and made the alternate steering section. I'll add the steering lever later. An interesting feature on the Bovington tank, the propeller steering system is different from other DD tanks I have seen. Most run the linkage down the right side and then across the rear. This tank has it mounted more to the middle, so I made mine that way as well. I also added some extra shielding near the exhaust pipes as the Bovington tank has, I assume to help protect the screen. The exhaust pipes were found in ye olde parts box.


Let's talk about the struts and braces on the tank. I have studied the available resin model kits, model builds and available photos to try to figure out the braces of these tanks. Of course, the Bovington tank is different from the rest. One of the major differences is that the Bovington tank does not have the large brace in the front where the usual dual struts would be mounted. Below is a picture of these struts that are more common on DD tanks.


The Bovington tank has one single strut in the center instead. Also, there are two L brackets with dual struts attached on each side. It looks like the Bovington tank does not have headlights, but since I already mounted mine I am going to work around them. The placement of these L brackets is probably not correct on my tank, but I'm using one of my artistic license cards and mounted them beside the headlights. I also had to remove the sirens from the right sides. There are a couple additional braces in the front as well. One is attached to the tank and seems to curve around in a bow shape, while the other goes across the front from each side. I'll worry about these later.


There are three braces on each side at the back, and three coming off the rear which you can see in a previous photo I posted. There are also two braces that will be mounted on the turret. More on those later.

I made the mounts for the braces and attached them to where I think they should be, or at least close enough. On one tank I touched them with yellow so they can be seen more clearly.

Spent the day putting the turrets together, including the strut mounts. Most DD tanks did not have struts on the turret. Finding any pictures of these struts attached to the tank is nearly impossible, but I found one.


The mantlet cover is slightly different on the kit tanks from the Bovington tank, but I'm going to roll with them. Also working on the air tanks. I plan to put two in the bow and two spares in the rear. I made them from wood dowel and some metal rings. The still need some work, but are coming along.

It appears there is a pair of struts on each side of the front hatches, so I added mounting gear for those. I am getting close to where I can paint the main pieces and begin work on the screens.

Almost forgot to construct the driver's platform on the turret. Here is a good picture of the placement of the platform. In the other picture you can see where the exhaust pipe is located. There was a danger of fumes building up in DD tanks, so many had these exhaust pipes installed. Some would rise above the screen while others were much lower. I decided to make mine lower for no special reason. Another detail you can see here is the 'SS' foundry marking on the turret. I originally used the 'C' marking, but the 'SS' is also included in the kit. This marking shows the turret was from the Scullin Steel Company in St. Louis, Missouri.


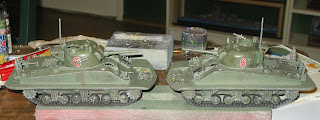
Amazing what difference a little paint can make. I have also attached the bogies to the tank hulls after taking this pic.

For tank marking, I picked up this Archer 1/35 13/18 Hussars "Charmer" Direct Vision M4A2 Sherman AR35173 decal set. The set is made for tank number 68, but I will magically make two tanks out of it. The '51' and seahorse marking can go on the front or back. This set turned out to be dry decals rather than wet slide off decals, but fortunately they attached very nicely. For number like this I prefer wet decals because you can reposition them as needed. I sprayed the turrets with gloss coat anticipating wet decals, but the dry transfers went on fine and then I sealed them with another gloss coat. Eventually, I will dull coat the entire tank.


Look...tanks! I have completed the major construction of the two tanks. The hatches are still off until I figure out which ones I want open when I install the crew. The tanks were weathered using a three-step process. Since these would be emerging from the sea, they wouldn't be muddy or dusty. I first coated the tanks with a black wash. This really helps take away that fresh olive green look. I then use a heavy dry brushing of burnt umber, but don't put it on too thick. Just so there is a hint of rust / wear. Finally, I dry brushed aluminum around the raised edges. Afterward I hosed them down with matt spray.
On the turrets, I installed smoke grenade launchers. The Bovington tank did not have these, but many British tanks had them so what the heck. I picked up the Resicast 1/35 Sherman Turret 2" Mortar & 4" Bomb Throwers 352297 set. On one tank, I decided to mount one of the Bomb Throwers just for variety, and the other will have a .50 cal. Pictures of these items are hard to find, but here are some reference pics. I guess I need to finally start on constructing the screens.


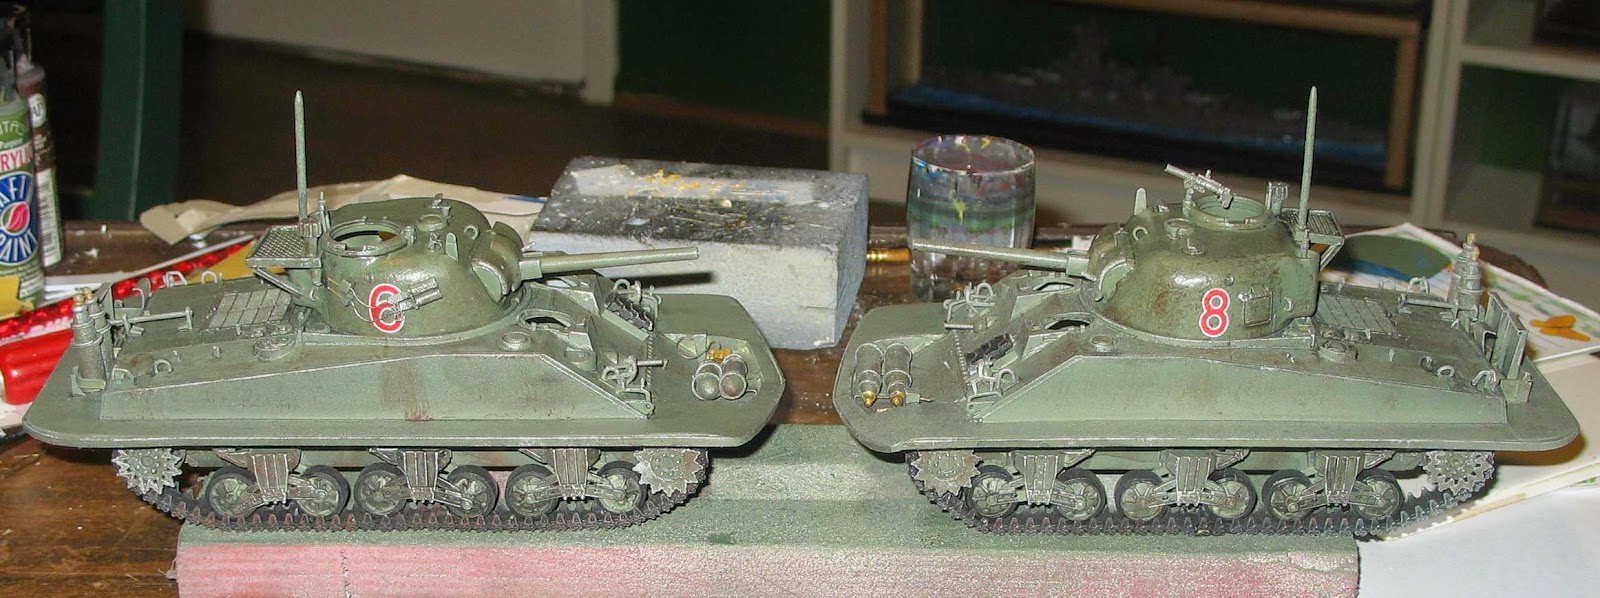
On the turrets, I installed smoke grenade launchers. The Bovington tank did not have these, but many British tanks had them so what the heck. I picked up the Resicast 1/35 Sherman Turret 2" Mortar & 4" Bomb Throwers 352297 set. On one tank, I decided to mount one of the Bomb Throwers just for variety, and the other will have a .50 cal. Pictures of these items are hard to find, but here are some reference pics. I guess I need to finally start on constructing the screens.


Well, got some progress done on the raised screen. First, let me go over staining the cloth. The cloth for the screen has a dirty look to it. In order to achieve this, I used the coffee staining method, which is basically soaking the cloth in coffee. You can also do this with tea. What I do is brew a nice strong pot of coffee with the cloth in the pot. You may have to put a little weight on the cloth to keep it from floating. After the coffee finished brewing, I turn off the coffee maker and dump the grains in the pot and leave it overnight. The just rinse the cloth and let it dry.


Now off to making the screen frame. This was quite a task. First, I made six frames out of 16-gauge wire and using the tank as a template.

I then made a template to mark where the tubes will go. I decided to make the tubes out of 1/4" aluminum rods. This way I can shape them as needed and they would hold up the screen.

Let's take a minute and talk about my first failures at making the screen. My initial plan was to solder the aluminum rods to the wire frame. I found out the hard way solder does not work on aluminum, so if you want to go this route then use a metal you can solder. My next attempt was to use two-part epoxy adhesive, which usually works great, and was a complete failure.
Finally, I used some thin 24 gauge wire and twisty-tie each rod to the frame. It is actually not as time consuming as it sounds. The rods will move on the frame, so after they were all tied on I used superglue to hold them in place.

Next, I used a Dremel with a cutting wheel and cleaned up the rods. The frame was then painted black.

I then went over the frame and painted it gunmetal.

Finally, the real screen had sleeves where the rods would slip through to attach the tubes to the screen. To simulate these I used some medical tape that had a nice cloth texture and cut it into little squares, then attached them to the rods. It was all sprayed with dull coat then.


Now that the frame is done, I attached the cloth to it. It was then taken outside and hosed down with dull coat and let dry overnight. This stiffened the cloth to the frame.


I cut a hole in the top and made that little part in the back and glued it on. So, the screen is pretty much done. I think it has a nice grimy look to it. I will probably coat it with gloss in some sections for a wet look later.

Crew is done.


Here is number 8 that will have the screen up. I will add two more crew members on the tank later. I usually see three crew members outside a swimming Sherman.

On the raised screen I did some more work on back part.

I added markings for the 13th/18th Royal Hussars.


A unique feature of the 13th/18th Royal Hussars DD tanks were these checkered flags used during the landing, so I made a couple and attached them to the screens.


Here I am working on a pair of DD tanks that landed on Sword Beach and today is June 06. Rather surreal. Anyway, I finally attached the screen to Tank 8. Not a small task. I am using a water-based gloss varnish that works great and is easy to clean up to brush over the screen.

Here are the struts for both tanks. I actually forgot to make a set after taking this picture. I am using SrtipStyrene #213 2.5mm rod for the struts. I used a thin cutting wheel to make notches in the ends to attach to the tank and added a little detail to simulate the hinges.

Another good find were these rubber hoses that match perfectly the hoses that come off the front of the tank. They originally were on an Ecto-1 diecast car that got trashed, but I never throw anything away I might use one day.

I have also been working on the display stands for the tanks. For the tank with the screen up, I wanted to show it emerging from the ocean. What I came up with is modifying a small box, in this case the box for the British tank crew I used parts of. I cut the top off on three edges and glued it down to make a ramp. The box was then painted blue and coated with clear silicone to make it waterproof. I will later use clear resin to simulate water. Brown was painted on the land part and then coated with white glue. I did the same to the other base with is just a cut piece of board. Sand was poured over the glue and gently pressed down. After drying, I sprayed it with clear varnish to seal it all in.


Struts are done. Now, I think I can finish these tanks up.

And...they are done! I attached the struts, driving lever, and added an antenna. The antenna is wire that I heated one end, then pushed it in place. Sand was spread on the treads using white glue. The resin will eventually dry clear on the screen-up tank, it is still a bit cloudy right now. Happy to finally add the DD tank to my collection!


I'm glad I found this. Looks good. I've been trying to find plans for the LCT mk. 5 that carried the DD tanks into Normandy.
ReplyDeleteThanks for the comment, these tanks were always a favorite of mine.
DeleteMy grandfather was a NCDU and went in on fox green Omaha. He was aboard one of the LCT's that deployed the DD's. I would like to make a diaroma of the whole group on the LCT including the LCM it was towing.
ReplyDeleteI believe I will need to use the M4A1(75) for the American Tanks used by the 741st and 743rd Tank Battalions on Omaha Beach.
ReplyDelete